In my review of this monitor I mentioned the issues regarding G-Sync on 10-series NVIDIA gpu’s like my 1080Ti. While running games or apps with highly fluctuating framerates or dropping below 60fps, the screen would go black for a couple of seconds or sometimes even go in stand-by mode. With the help of several forum posts and Reddit user u/Tup3x I can provide you with a temporary fix until (probably) NVIDIA fixes the issue.
This guide requires you to edit the EDID (extended display identification data) provided by the monitor using a tool called Custom Resolution Utiliy. The process takes just a couple of minutes and all changes can be reverted quite easily. If you do manage to mess up something and not get an image through displayport you can always plug in the HDMI cable and revert your changes from there. That being said, I’m in no way to be held responsible if you do manage to permanently mess something up. Let’s get going then, shall we?
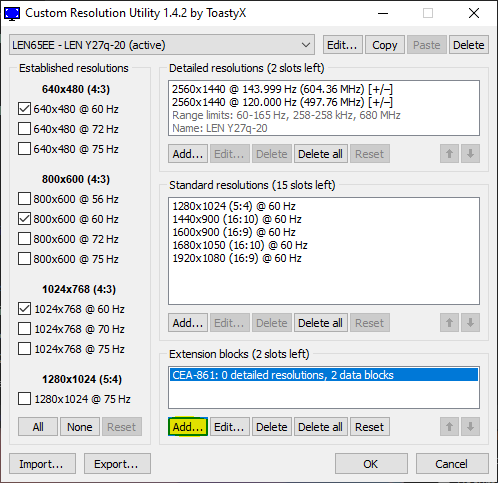
After downloading CRU, unpack it to a folder on your desktop. In this folder you’ll find the main executable CRU.exe and some other files which we don’t need right now. Open up CRU and you’ll be presented with the folowing.
Step 1

I’ll be highlighting all the buttons you need to press or items you need change/input. So first, make sure the monitor is set correctly from the dropdown menu on the top left. Also make sure it says active so you know it’s the on currently connected. Press the Edit… button next to it to open the following menu.
Step 2
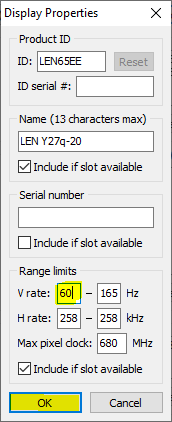
From here change the V rate to 60 and press OK.
Step 3
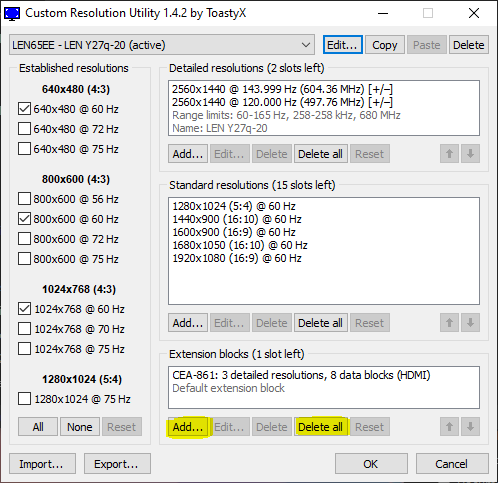
Next you have to press Delete all which will remove all Extension blocks. If you wish to use audio from your display, click Add… to add a new Extension block. If you don’t need audio in/out from your display then you can continue at step 12.
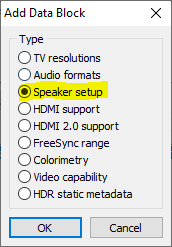
Step 4

Make sure CEA-861 is selected and click the bottom Add…
Step 5

Select Audio formats and proceed by clicking OK.
Step 6

Click Add… to continue.
Step 7

Copy the values from above and click OK to add it.
Step 8

Make sure the newly added format is added to the list and click OK.
Step 9
Then add another Data block by clicking add and this time select Speaker setup.
Step 10
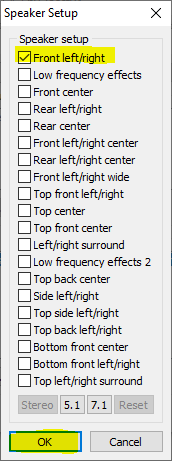
Make sure Front left/right is selected and click OK.
Step 11

Check that you have two Data blocks present and click OK.
Step 12
Back in the main screen click Add… again to add back a 165Hz mode.
Step 13
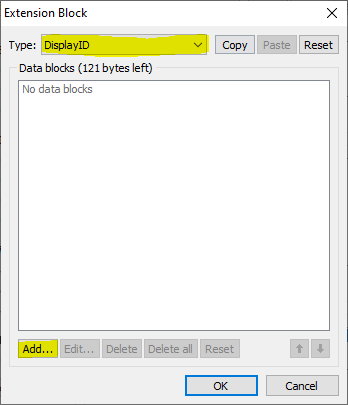
Change to dropdown to DisplayID and click Add.
Step 14

Select Detailed resolution and click OK.
Step 15
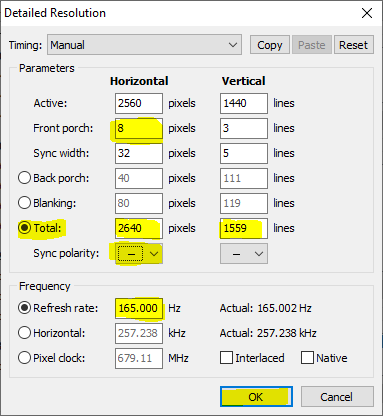
Change all highlighted values and make sure the rest match the ones above, then click OK.
Step 16
Confirm that it has been added and click OK.
Step 17
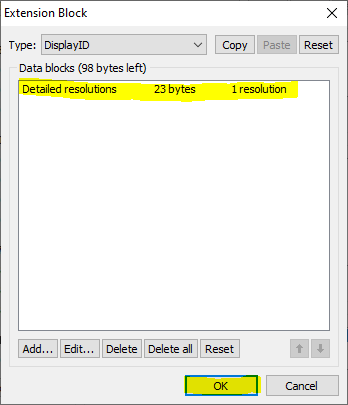
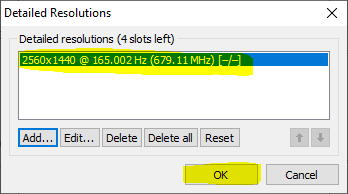
Again, confirm that there is one Detailed resolutions entry with 1 resolution and click OK.
Step 18

Confirm all values look like this before finalizing your adjustments by clicking OK.
Step 19
In the CRU folder you’ll find two restart utilities, you’d probably want to run restart64 but if you’re still on a 32-bit-operating system you should open restart. Your screen will flicker as the ‘new’ display device is detected. Then make sure you’re still running at 165Hz and that G-Sync is enabled.
After this you should be all set, enjoy G-Sync! If you wish to revert any changes, simply run the reset-all executable.
I do this stuff for my own enjoyment but if you are feeling generous you can buy me a cup of coffee.

Thank you!
LikeLike
No problem, I hope it helped.
LikeLike
Thanks, this article is gold!
Also a tip if you want to add to your article to re-enable 10bit color in Nvidia Settings.
LikeLike
Good tip, thank you for your reply.
LikeLike
Hi, Thanks for the article, I recently purchased this monitor and if g-sync is enabled, no matter what hz, there is a flashing row of pixels on the top of the monitor. I was wondering if you have experienced this. Thank you!
LikeLike
Hi, I recently purchased this monitor, and I was wondering if you have experienced the top row of pixels on the monitor flashing when g-sync is enabled and only in game. Thank you
LikeLike
I did not notice this at all on my unit. Are you using the latest drivers for your graphics card?
LikeLike
Yes, I was wondering if maybe the latest update might have caused this issue. I have since set the max frame rate to 120 and it seemed to have made the issue less common but still occurring there and here.
LikeLike
Hello, I read that others with the monitor AGON AG352UCG6 had the exact same issue and lowering the resolution with a custom resolution seemed to fix it for them. (I did revert drivers and it didn’t help) I created custom resolutions of 2560×1439, 2560×1438, and 2560×1437. In game (Sims 4) if I switch between these resolutions and eventually 1437, the flashing disappears and if I switch back to 1440, it seems to disappear also or have very minor flashing and doesn’t happen all the time now, at 165 hz but rarely actually hitting those frames.
LikeLike
Thank you really much.
But stupid question : Step 15. Why so high “Total resolution” ?
LikeLike
Has to do with all other parameters required for syncing etc.
LikeLike
Thank U VERY VERY MUCH..
I got stressed by black screen issue
I changed my vga card, reset motherboard, reinstall windwos but anything can’t help me
thank u again
I’m Korean so I can find this post hardly
can I share this post in Korea site?
I hope helping someone who suffer this same problem in Korea
LikeLike
You’re welcome to share my post, glad I could help you.
LikeLike
thank you truly helped but I can’t find the HDR setting do you know how to fix it
LikeLike
thank you truly helped but I can’t find the HDR setting do you know how to fix it
LikeLike
After I turned G-Sync on my PC froze.
But after a restart everything worked just fine.
Thank you so much.
LikeLike
Thanks so much!
LikeLike
Indeed removing the CEA-861 block also removes HDR support. It is probably best to just remove the “Default extension block” and edit the CEA-861 block to remove the TV resolutions and add the 2k 165 Hz refresh rate which not only allows keeping the HDR, but also allows having 144/165 Hz DSR which would not be possible on this monitor otherwise since Nvidia’s driver applies DSR to the phantom 4k TV resolution instead of the native 2k resolution.
LikeLike
Is there any way to update output color depth from 8bit to 10bit after this fix? I don’t get the option in nvidia control panel after applying this..
LikeLike
I still have the option to enable 10bit.
LikeLike
Thank you for the advice! I could not get the cru.exe file to run on my computer. Would by by any chance be able to share the exported CRU profile created so I could compare it to mine?
Thank you!
LikeLike
Hello. Is it possible to get HDR functionality back while still retaining this fix? I did the fix without realizing that it would remove this feature, which is part of why I’d bought the monitor.
LikeLike
The fix stopped working for me a while ago. I have this problem even at 144Hz even if reset everything (with reset-all.exe).
LikeLike
You must’ve done something wrong, it’s still working fine for me. I’m on the latest drivers.
LikeLike
Good to hear. I’ll try it again. Thanks for the reply.
LikeLike
Anybody have settings for a Dell S2721DGF? I tried using the settings in this article but it wasn’t compatible. Thanks
LikeLike